- A Cookbook from 1749 and a Tool That Arrived with It
- Read the Mat Before You Roll
- Rolling Sushi: Pressure, Patience and the の Turn
- The Inside-Out Question: Uramaki vs the Traditional Roll
- The Best Sushi Kit is the One That Builds a Skill
- What Keeps Going Wrong - and Why
- The Roll You'll Be Proudest Of
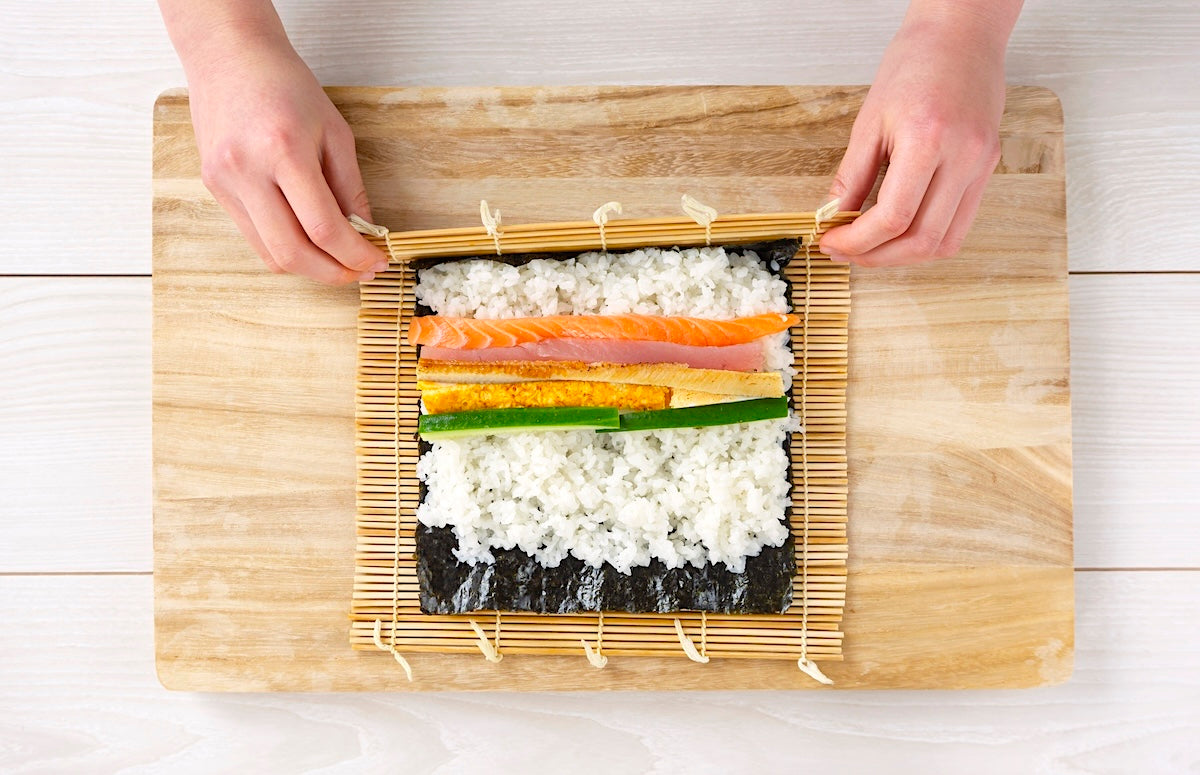
Many people assume the hard part of making sushi rolls is the rice. It isn't. The hard part is everything that happens once you've laid the nori flat, spread the shari over it - and pick up the mat.
The makisu - the bamboo rolling mat used to shape sushi rolls, datemaki omelet and other Japanese dishes - is no more than a rectangle of bamboo slats connected with thread. No moving parts, no settings, no instructions in the box. Yet home cooks the world over have stared at one of these for longer than they'd care to admit, wondering why the roll they just produced looks like something salvaged from a minor earthquake.
This guide is for those cooks. It covers the mat, the technique, the inside-out roll, the beginner mold and the mistakes that turn up so reliably they deserve their own section. It also covers what none of the gadgets to help beginners can fully replace: the feel of getting it right under your own hands.
A Cookbook from 1749 and a Tool That Arrived with It
Maki sushi - rolled sushi - appears in the records as far back as the 18th century, with its own entry in Ryori Sankaigyo (料理山海郷), a Japanese cookbook published in 1749. By the 1780s, the dish had spread from Osaka to Edo - the old name for Tokyo - carried along by a townspeople culture that treated fast, well-made food as a form of civic pride.
In Edo, that pride expressed itself in restraint: while Osaka favored futomaki - thick rolls packed with ingredients - Edo sushi culture preferred the hosomaki, a thin roll built around a single filling such as kanpyo gourd strips.
The makisu arrived in step with this history, its precise origin unclear but almost certainly rooted in the same Edo-period moment.
Read the Mat Before You Roll

A bamboo rolling mat has a front and a back - check which side is facing up before you start rolling your sushi.
To find the front, look for the smooth, flat side of the slats where the bamboo skin is intact. This should face up when rolling, it's also the side that the nori and rice go on. The surface is slicker, so food releases cleanly rather than catching in the grain.
The thread knots should sit at the far end of the mat, away from you, so you don't inadvertently roll them into the sushi.
Quality in a makisu can be measured by the gaps between the slats: the narrower the spacing, the more evenly the mat distributes pressure against the roll and the more clearly you can feel what's happening inside. This tactile feedback - the slight spring of good bamboo communicating how firmly the ingredients are sitting - is what separates traditional bamboo mats from plastic alternatives.
Plastic molds make clean-up easier and are more durable in a practical sense but they do not give you an idea of what's happening inside the roll.
Still, bamboo mats and plastic molds are united on one point: they should never go in the dishwasher. neither should
Bamboo, in particular, requires hand-washing and thorough air-drying in a shaded, ventilated spot. Any moisture left in the slats will produce mold that penetrates the bamboo fibers. Avoid storage in sealed plastic bags, which will trap humidity.
Before rolling, lightly dampen the mat to prevent rice from sticking to the bamboo. For uramaki - inside-out rolls where rice forms the outer layer - cover the mat with plastic wrap first. This will stop the exposed rice from clinging to the slats during rolling.
The makisu is also used beyond sushi. Datemaki, the sweetened rolled omelette that appears in Japanese New Year dishes, relies on the mat's ridged underside to imprint its characteristic pattern, and the mat's ability to shape and compress applies to a range of Japanese prep tasks beyond the rolling mat's obvious purpose.
Rolling Sushi: Pressure, Patience and the の Turn
To understand sushi-rolling technique, think of it not as rolling a cylinder but as making a fold.
When you lift the near edge of the makisu and bring it forward, the goal on that first motion is to bring the near edge of the rice to meet the far rice line - not to push the whole thing over in one rotation, but to fold the near third onto the far third, trapping the fillings in the middle as the rice connects.
Japanese home cooking sources describe the shape you're aiming for as the hiragana character の: a curve that closes in on itself without overlapping.
Before that happens, spread the shari - sushi rice - evenly across the nori in a layer thin enough that you can faintly see the texture of the seaweed underneath, leaving about 3 cm uncovered at the far edge and a smaller margin of 5 mm to 1 cm at the near edge.
Use a rice paddle rather than a spoon; the flat, wide surface lets you distribute the rice in an even layer without pressing down on the grains.
Shari should be at body temperature or slightly cooler - rice that's still warm from the rice cooker will soften and eventually tear the nori before the roll is finished and, for uramaki, warm rice weakens the outer layer's adhesion.
For futomaki - thick rolls intended to hold many ingredients - place fillings horizontally across the rice, roughly one-third of the way up from the near edge, with firmer core ingredients first and softer ones arranged around them.
For hosomaki, the same positioning applies but with less of everything: around 80 to 100 g of shari per roll, nori cut to half-sheet width.
When you roll, do it decisively. Hesitation produces uneven rolls; the mat shifts slightly between tentative adjustments and the rice bed loses its shape.
Once the first fold is made, hold the filled portion lightly with one hand while pulling the mat toward yourself with the other, creating even pressure from above and from the sides simultaneously. This is not a squeezing motion so much as a shaping one: the goal is to settle the ingredients together, not compress them into a cylinder of flavored concrete.
Applying excessive force after the roll is complete tears the nori and crushes the vinegared rice into a dense mass that has neither the texture nor the lift of properly made shari.
Press gently over the mat with both hands to finish the shape, then rest the roll seam-side down for 15 to 30 minutes before cutting - long enough for the nori to seal itself against the rice and the ingredients to settle together.
When slicing the roll, wet the knife or wipe it with a damp cloth - use water or water mixed with a small amount of rice vinegar - and do this between every cut. A dry blade drags through the rice and pulls the nori apart. Use a smooth pulling motion rather than pressing straight down.
The Inside-Out Question: Uramaki vs the Traditional Roll

In a traditional norimaki, the nori is the outermost layer, holding everything inside. The structure is ancient and efficient: seaweed on the outside, rice and ingredients within, the whole thing sealed by the nori's natural adhesion when it becomes moist. You can smell and taste the nori from the first bite and, as it absorbs moisture, it moves from crisp to subtly chewy, blending with the rice in a way that is distinctly Japanese.
Uramaki - literally 'reverse roll' - inverts this entirely. Rice is on the outside; the nori hides inside, wrapped around the fillings. The technique emerged in Los Angeles in the 1960s, developed by sushi chefs for American diners who found the dark color and chewy texture of seaweed off-putting.
Hiding the nori inside the roll solved the problem and the result - softer, moister, with a surface that could be rolled in sesame seeds or tobiko, flying fish roe - became the California roll and then a template for a new chapter of sushi-making.
The position of the nori inside or outside the roll determines how the bamboo mat is used. For uramaki, plastic wrap goes over the mat before anything else. Nori is placed on the wrap, shari spread across the entire nori surface with no far-edge margin (since the rice is becoming the outside, not the inside), then another sheet of plastic wrap laid on top of the rice.
The whole assembly is flipped so the rice faces down; the top layer of plastic is removed to expose the nori, fillings are placed on the nori and rolling proceeds with the bottom plastic wrap still in place.
The wrap prevents the outer rice layer from sticking to the mat during rolling, and the finished roll should be kept wrapped in plastic until sliced - cutting through the plastic keeps the outer rice intact and produces the clean cross-sections that make uramaki worth the extra steps.

The softer exterior and the decorative potential of uramaki work best with ingredients that complement the gentler mouthfeel: avocado, cream cheese and salmon.
The traditional roll, with its nori exterior, suits sharper, cleaner fillings - a single strip of kanpyo, a piece of fresh tuna, a line of pickled plum - where the seaweed's ocean character becomes part of the flavor.
The Best Sushi Kit is the One That Builds a Skill
There are now several gadgets to help beginners make sushi at home and the most common is the plastic cylindrical mold - sometimes called a bazooka roller for the way the finished rice log is pushed out through the tube, like a slow-motion kitchen special effect.
These are inexpensive, widely available at Daiso and other 100-yen shops and they deliver on their promise: evenly shaped, structurally consistent rolls that come with a learning curve so shallow it barely qualifies as a curve.
But the limitations are just as consistent. A rigid mold compresses the rice grains evenly and without variation, which produces a dense, slightly hard mouthfeel - the textural opposite of well-made shari, which should feel light and yielding because air has been preserved between the grains.
Molds also restrict what you can make: standard cylindrical shapes for futomaki, nothing for uramaki and nothing for the decorative kazari-maki rolls where the cross-section reveals a flower or a pattern.
Cleaning requires disassembling various pieces and the assembled kit takes up more storage than a flat bamboo mat.
As a basic accessory for occasional home use, a sushi mold is a perfectly sensible tool. As a substitute for learning to use the bamboo mat, it's a detour that eliminates the need to develop the skill it was meant to support.
What the mold cannot teach you is the key thing: how much pressure is enough. The bamboo mat, used properly, communicates this through your hands. You learn it by feel, repeated, until it becomes automatic - the way a good sushi chef works, one roll barely distinguishable from the last in weight, density and shape.
What Keeps Going Wrong - and Why
Sushi rolls fail in patterns and the patterns are predictable enough that most mistakes can be diagnosed from the cross-section alone.
Too much rice is the most common issue. When the shari is too thick or spread too close to the far edge, the nori doesn't have enough bare surface to seal against itself when the roll closes, and the roll bursts at the seam.
The fix is to spread the rice thinly enough that the nori texture is faintly visible beneath and to ensure that the 3 cm far-edge margin is left clear.
A loose roll - one that falls apart at the knife - usually means the first fold didn't connect the rice edges cleanly, leaving a gap of air at the center.
On the first full turn, that moment when the near rice meets the far rice, is when the roll needs to be tightened: pull the mat toward you and apply gentle downward pressure at that instant. Not doing it is the culinary equivalent of stopping a handshake halfway through.
Watery fillings soften the nori too quickly, which breaks the seam before it can form. Patting ingredients dry with a paper towel before using them takes 10 seconds and prevents the most frustrating variety of sushi failure.
And the ends: if the cross-sections taper or look hollow, the shari was not spread evenly all the way to the side edges of the nori. Rice needs to reach the full width of the sheet, leaving only the far-edge margin clear.
The Roll You'll Be Proudest Of
There's a version of sushi rolling that relies entirely on plastic tools. They're useful, especially for beginners, and capable of producing something good.
But the bamboo mat - used without shortcuts, learned through enough bad rolls to know what a good one feels like - is a different proposition.
It takes time to master because you're learning more than a technique. You are learning to use your hands to judge what you cannot see - and the bamboo mat is your teacher.